Water damage restoration takes time, but the timeline depends on a variety of factors. The most critical element is the initial assessment and mitigation.
This step includes dehumidification and drying, which prevents mold proliferation and structural degradation. It also involves removing and replacing any materials that were saturated. The drying process typically takes three to five days, but weather conditions can extend this period. Visit Water Damage Cleanup Salt Lake City for more information.
Initial Assessment and Mitigation
Water damage can be caused by a variety of sources, from burst pipes to severe weather. In many cases, flooding or excessive moisture can lead to mold and mildew growth and structural issues that require costly repairs. This can have a negative impact on home value and make a house less appealing to prospective buyers. However, if the issue is promptly addressed with water mitigation services, it can minimize long-term damage.
Water mitigation professionals use a thorough inspection to identify the extent of the damage. This includes a visual examination of the affected area, moisture readings with specialized equipment, and an assessment of the source and category of the water intrusion. This information is crucial for planning restoration work and communicating with insurance providers.
Once the inspection is complete, professionals can start removing standing water and placing air movers and dehumidifiers to start the drying process. This helps to minimize mold growth and keep moisture to a minimum, which in turn can save money on repair bills down the line.
Professionals also carefully clean and disinfect affected areas. This can include scrubbing and vacuuming surfaces, and sanitizing soft contents like curtains, pillows, and mattresses. Thorough disinfection protects health and prevents lingering odors.
It is important to choose a company that is IICRC certified and has a good track record in the local community. Look for a team with years of experience and the right equipment to tackle any type of flood cleanup. Additionally, be sure to find a company that offers a guarantee in case of any future problems. This gives you peace of mind that you’re getting the best possible service. Water damage cleanup can be a complicated process, but with prompt action, you can safeguard your property from long-term damage and prevent expensive restoration costs.
Cleaning
The next phase of water damage cleanup involves thoroughly cleaning and sanitizing affected areas and contents. This removes bacteria, mold spores, dirt and debris, as well as odors. The length of this stage depends on the type and extent of contamination, as well as the amount of time the area has been exposed to water. The most severe forms of water damage require extensive decontamination, which takes the longest to complete.
The first step in the cleaning process is to stop the source of water intrusion and address any structural damage. This may involve shutting off the water supply or fixing a broken pipe. It also includes removing standing water as quickly as possible to minimize structural damage and prevent mold and other issues from developing.
Cleanup professionals then move to the cleaning and drying stages. This process includes sanitizing and disinfecting affected surfaces and materials, including removal of unsalvageable items and structure parts like wood studs and plywood. It also includes extraction of standing water, as well as use of fans and commercial-grade dehumidifiers to lower humidity levels and speed up drying times.
The drying phase involves monitoring moisture levels with hygrometers and making adjustments as needed to bring moisture down to acceptable levels. This is vital to ensure that the building and its contents are completely dry, which will inhibit the development of mold, mildew and other microbial growth. It will also help to avoid long-term damage to wood, drywall, insulation and other building components. It is often necessary to move items and furniture out of the affected areas, and this can prolong the drying process as it must be done carefully to prevent damage.
Drying
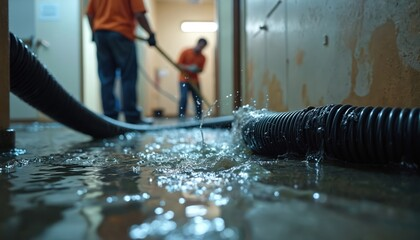
The next step in water damage cleanup involves removing any standing water and drying out the affected areas. This is a crucial step as the longer materials are exposed to water, the more damage they will suffer. The first step in this phase is to remove any surface water using pumps and vacuums. A specialist may also use a moisture detector and an infrared thermal camera to locate any hidden pockets of water behind walls and floorboards.
Once all the water has been removed, the restoration process can begin. Drying can take from three to five days, depending on the size of the flood and the length of time that the building materials were saturated. During this stage, the experts will utilize industrial air movers and dehumidifiers to speed up the process. They will also open windows and doors to allow the affected area to get plenty of airflow.
This is a complicated process because porous materials like wood and drywall can hold on to water for a long time, so they must be dried slowly. The type of material is also a factor, as some materials will be more difficult to dry than others. For instance, drywall is more difficult to dry than plaster or concrete. This is why it’s important to hire a professional water damage restoration company, like Rumsey Construction, that has the proper equipment for this job.
Once the flooded areas have been thoroughly dried, it’s time to clean up and sanitize them. This is done to prevent the growth of mold and other bacterial contamination. It’s also a good idea to have any personal items cleaned to prevent them from absorbing germs and bacteria.
Repairs
The repairs phase of water damage restoration involves repairing and restoring the affected areas to their pre-loss condition. This can include everything from replacing drywall to rebuilding sections of the home. It can take several days to weeks, depending on the severity of the damage and any mold remediation that may be required due to prolonged exposure to moisture.
This phase begins after all surface water has been removed and the area has been sanitized. It can involve using equipment like moisture meters and thermal imaging cameras to identify hidden pockets of moisture behind walls and underneath flooring, and air movers and dehumidifiers to promote circulation and accelerate drying. This step can also involve removing and disposing of any materials that are beyond salvageable.
In some cases, it may be necessary to replace drywall and carpeting, as well as cabinets and other furniture items. This can increase the restoration timeline significantly. If the water damage has been extensive, it may take months to restore the property to its original condition.
It is critical to act quickly after any water damage occurs, as the longer moisture remains in porous building materials, the more extensive the damage will be and the higher the risk of long-term health problems and costly restoration costs. Postponing water damage restoration can lead to irreparable structural damage, mold growth, and the loss of valuable possessions.
The repair process can be accelerated by acting quickly and calling in professionals who specialize in water damage restoration. The experts can provide a detailed estimate of how long it will take to complete the project and work around your schedule. This will ensure that you can return to your home as soon as possible while ensuring the restoration process is completed correctly.
Odor Removal
Even after structural issues have been fixed and the area has been dried, lingering odors may remain. These persistent smells are often the telltale sign of hidden mold that can pose serious health risks. Inhaling mold spores can trigger allergy-like reactions such as sneezing and itchy eyes, especially for those with asthma or weakened immune systems.
When it comes to removing musty or earthy odors, the best course of action is to call in an experienced professional. They’ll use specialized odor removal techniques to eliminate the odor and prevent further damage.
Assessment (1-2 days)
Experts inspect the affected areas and develop a customized restoration plan based on their findings. They’ll also stop the water source as soon as possible to minimize damage. Water Extraction (1 day)
Professionals use pumps and wet vacuums to remove standing water quickly, reducing the chances of extensive structural damage.
Cleaning (2-4 days)
Once the water is removed, professionals will clean and sanitize all affected surfaces and belongings to prevent mold and odors. They’ll also dry the area using fans and dehumidifiers.
Repairs (2-5 days)
This phase depends on the extent of repairs needed, which can range from minor to extensive. This includes any drywall, wood and carpet replacement required to restore a home or business to its original state.